Manifesto for Agile Estimating

We are uncovering better ways of estimating by doing it and helping others do it.
Through this work we have come to value:

  • relative estimation over absolute
  • predictability over speed
  • consistency over (fake) improvement
  • done items vs progress of on-going items

That is, while there is value in the items on the right, we value the items on the left more.

My Smart House Adventure – 3 years later

it’s 3 years since I wrote the first IoT program (“Hello, World!” in IoT reads “blinking LED”) and all the devices are still up and running.

I missed the 2 years update, I could blame COVID-19 for it, that would not be true, never mind.

In the meantime, besides the trivial (and the most useful) on/off control of light switches and plugs in various factory formats, the focus was on remote heating system control – thermostat.

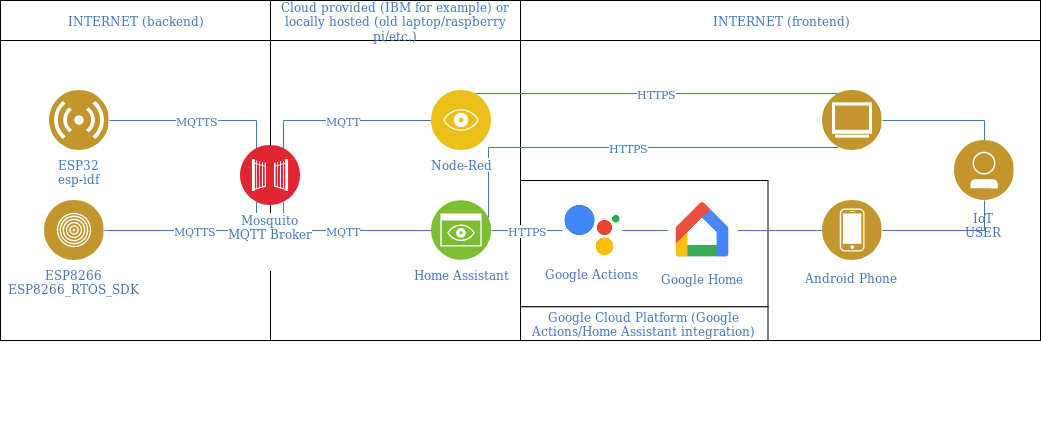
The base software is working on ESP32/ESP8266 dev boards, but the architecture is dependent on internet connection (which was surprisingly stable, but still) something to be avoided – it’s acceptable that you cannot control the thermostat if the internet it’s not working, but not so acceptable to have the heating system off when the internet it’s not working.

I used this winter’s long nights were used to solved this architectural issue and the (first) result it’s an all-in-one thermostat controller that has the temperature/humidity sensor and the relay control in the same box.

It’s was not a smooth ride and I still have the GPIO0/relay flicker at power-on (known issue on ESP8266, I could bet that in one of the last week long evenings it was working properly), but as Voltaire, the French writer, said, “The best is the enemy of the good.”

This is how very first one is looking, hopefully the software is a lot better than the hardware/layout (I really need to find a proper case).


My Smart House Adventure – 1 year later

While there are many solutions around, it feels good to have designed, written and customized your own 😉

Still, to much customization is wrong, as it makes inter-working harder. That’s the reason why my current work focuses on simplify and make my firmware easier to integrate with hass.io.(and by it with Google Home).

While the work is still (and will be for quite some time) on-going, it looks pretty nice and it’s way more stable than expected.

For the gory details, you can check the source code: https://github.com/cipibad/mqtt_esp

Cipex IoT firmware autoconfig(Configurarea firmware-ului IoT Cipex)

1. Enter in config mode (identified by fast blink):
a. press the button for approx 5 seconds
b. wait approx 10 seconds for config mode (~3 blinks/second)
2. Configure wifi (device is in config mode, fast blink):
a. connect your android phone to wifi where you want device to be connected
b. start ESPTouch app (download from: https://drive.google.com/uc?export=download&id=146zqavqZWOVhHSaaQiItJV2L1350KnFv)
c. enter wifi password
d. press confirm button and wait for success message on the phone
e. device will reboot in 10 seconds to normal mode:
I: normal blink (~2/second – connecting to wifi)
II: slow blink (~1/second – connecting to mqtt)
III: on: connected to mqtt, device can be used from web interface


Echipamentul are 2 moduri de functionare:

A. modul configurare (folosit pentru a configura reteaua si parola wifi) – clipiri rapide – approximativ 3 clipiri/secunda are LED-ului.

B. modul normal (modul in care cunctioneaza ca un intrerupator ce poate fi comandat local sau de la distanta), diferite moduri de clipire in functie de stare:

I: clipire normală (~ 2 / secundă – incearca sa se conecteze la Wi-Fi)
II: clipire lenta (~ 1 / secundă – incearca sa se conecteze la serverul de control de la distanta)
III: permanent aprins: conectat la serverul de control de la distanta, dispozitivul poate fi utilizat prin interfața web

Configurarea initiala a parolei/userului wifi:
1. Intrați în modul Config (identificat prin clipiri rapide):
a. tineti butonul apasat timp de aproximativ 5 secunde
b. așteptați aproximativ 10 secunde pentru automat in modul config (~ 3 clipiri / secundă)

2. Configurați wifi (dispozitivul este în modul config, clipește rapid):
a. conectați telefonul Android la WiFi unde doriți ca dispozitivul să fie conectat
b. porniți aplicația ESPTouch (descărcați de la: https://drive.google.com/uc?export=download&id=146zqavqZWOVhHSaaQiItJV2L1350KnFv)
c. introduceți parola WiFi
d. apăsați butonul de confirmare și așteptați mesajul de succes de pe telefon
e. dispozitivul va reporni în 10 secunde în modul normal:
I: clipire normală (~ 2 / secundă – conectare la Wi-Fi)
II: blink lent (~ 1 / secundă – conectarea la mqtt)
III: conectat la mqtt, dispozitivul poate fi utilizat de la interfața web

Intrebari:
q1: am intrat in modul config din greseala, nu vreau sa reconfigurez, cum revin in modul normal?
a1: deconectati si reconectati echipamentul la retea

My Smart House Adventure – MVP

Minimum Viable Product (MVP) is a product with just enough features to satisfy first customers and to provide feedback for future development. Simplifying the basic architecture even more, it will get to bellow MVP architecture.

Smart house – MVP architecture

Web interface to control smart plugs

Sonoff S20 smart plug with custom open source software

I am preparing few devices (3-5 smart plugs/smart plug extensions) and share them for free for one month to get feedback and see how viable the solution is.


My Smart House Adventure – Implementation

Here you can find the software pieces I am using to implement the basic IoT architecture.

On IoT devices I use custom lightweight open-source firmware based esp-idf/FreeRTOS (there is much to be improved on that code, it is on-going medium priority work)

Eclipse Mosquitto is an open source (EPL/EDL licensed) message broker, suitable for use on all devices from low power single board computers to full servers.

Node-RED is a programming tool for wiring together hardware devices, APIs and online services. It also provides a nice web interface.

Home assistant is an open source home automation that puts local control and privacy first. While it can provide full home automation and it has his own web interface, I use it primarily as a proxy to Google Actions/Google Home in order to get the voice command interface to home automation

My Smart House Adventure – The (Basic) Architecture

A basic IoT architecture

The ideas of the above architecture are:

  • IoT devices should be as simple as possible in order to increase reliability and uptime (here you can see my telecom background)
  • SSL/TLS MQTT (Message Queuing Telemetry Transport) is the protocol of choice as it is a secure lightweight publish-subscribe-based messaging protocol (also an ISO standard)
  • There should be a secure responsive web interface to be accessed from PC/smartphone
  • There should be a secure integration with a voice phone assistant


My Smart House Adventure – The beginnings

For a long time, I thought the smart house was either a fad or something super expensive, for the “people with the money”.
However, two “use-cases” have caught my attention:
– UC1: being able to remotely turn off a light you forgot on while leaving the house (there are many variants of similar situations)
– UC2: being able to turn on/off my garden water pump with voice command. While I do have my two children around me while gardening, I was sure it was more reliable to get “ok, google, turn on my water pump” working 😉

It took me 7 months of 1-2 hours work after 10pm (in the days when I still had some energy to burn) and many good advises from my friends to get from the first Arduino example (turn LED on) to “ok, google, turn on my water pump”.

– Was it expensive?
– No, not really. What I use today (bathroom lights + hot water control + garden water pump control + mqtt/hass/node-red bridge) should be less than 100 USD.

– Is it secure?
– As secured as any device connected to the internet can be (all connections are secured, all running software is open source). I leave lights/hot water control on permanently as nothing really bad could happen, but I do keep water pump unplugged as I see the risk to big.

– Can I have something like this for my house?
– Sure. My intention is to publish all I did, the architecture I used, the sources of the software, etc. You can try to build it yourself or ask for help.